

Day: August 1, 2022
What are Effects of Change Management in Organisation
Fundamentals of Planning in Management Studies
Policy Development Process
Pradhan Mantri Jan Dhan Yojana (PMJDY)
What are Government Schemes for Financial Freedom
How to Accept the Invitation to Join the Content Writing Portal
When bots start creating content, how will the role of human writers evolve/become obsolete?

As the technology is upgrading and artificial intelligence is making things much easier, there’s a chance of bots creating content in the future too. Artificial intelligence nowadays only assists and makes small changes but it may be possible that in future it creates the full content and doesn’t require human intervention. So, there are two aspects of this predicted as the AI is evolving. First, those kinds of writing include fact and data-based writing and secondly writing with a creative angle.
IMPACT ON FACT AND DATA-BASED WRITING BY BOTS
Without any doubt, fact and data-based writing are being taken by the bots in upcoming years or at least maximum work is done by the artificial intelligence like the sports update based article or the smartphone comparing article. These only include a basic change in data and the bots can easily make it ready to read. Types of niches that can be affected in near future are
- Sports
- Email sequence
- Annual reports
- Product Comparison
- Review
As all of these are written with data-based articles and can be easily fed and written by the bots this doesn’t require an emotional quotient to write. Product comparison of some gadgets is only required to edit its specifications. While there are also contents that require human intervention and are unable by bots to write content with that emotion.
CREATIVE WRITING BY BOTS
Creative writing is the area that requires deep thinking and emotion which can be delivered while writing and it’s very hard for bots to deliver such emotionally engaging content. This area always needs human intervention to increase readability. If the content is dramatic and needs to be unique, it needs imagination and bots are not built according to it, they are just a set of instructions and can be performed efficiently.
Social Media and Marketing
Social Media and Marketing

Have you ever wondered what would happen if social media could not be part of the changing technology or innovation? What would happen if you were still using the phone with keypads and you don’t have any easiest way to share information with friends? Today with the availability of social media no one can ever think about it. Nowadays everything is just one click away.
A large number of social media platforms are available like Instagram, Facebook, WhatsApp, Twitter, Linked In, etc. These platforms make everything easy. Earlier, they were just used for fun purposes like chatting with friends, making new friends, watching entertaining videos, etc. But nowadays, it is also used for business purposes and professional work. After the pandemic, almost every official work is conducted using social media. One can do their work from home and this help to save a lot of time. One can conduct meetings, classes, webinars, group discussions, etc. using social media which doesn’t require and physical presence. With the availability of the vast number of new software, nothing is impossible to do on an online platform. There was a time when you had to wait for a long time to complete your official work in government offices, but today one can do this work at own on the government’s official portals.
Currently, social media is used for marketing to a great extent and we can see a lot of marketing content on social media. This activity of promoting or marketing your business or product on social media is called social media marketing. You can make creative content to promote your business on Facebook, Instagram, Twitter, Linked In, etc. A lot of small business has grown in a short period using social media platform. Your product can be a perfect fit for anyone and they can share it with their friends too which can increase brand awareness. It is a great platform to boost and transform your business.
With the innovation of new technology and the world, social media marketing is the easiest way to sell your product and promote business and the easiest way for the customer to buy goods and services. Over a couple of years, we can see a great boon in the increase of businesses and startups. Marketing your product on social media is not at all difficult. One can create your website or account on social media platforms to promote your goods and services. Many social media handles are also available which also help you to promote your product. It’s upon you how creatively you can promote your services so that they can reach a large audience and it is not hard at all because the large mass audience is available on social media and you just need to think about how you can trigger them.
You should be consistent on the platform by posting the content promptly for a great reach to the audience. Your content should reflect the features and quality of your product which helps to increase your audience. This marketing style makes it easy for companies to keep track of the progress and success of their business.
Social media marketing not only helps to gain potential customers but also helps to recruit potential employees. It allows the audience to post their reviews and comment about the product, which helps the company to work effectively. Earlier, business firms use hoardings or banner for advertising their product, which tends to be costly and time-consuming but now social media marketing strategy is cost-effective as well as time-consuming which result in better audience engagement due to the ability of the internet to reach large masses across the world. It also helps to reduce the barrier of communication between customers and the business organization and build communities of customers where they can express their needs and wants. It helps to connect the customers and businesses with the same needs and wants.
Nowadays, the online market has a large audience than the traditional market due to the availability of an infinite number of services available on online platforms and this tends to increase the competition in the online market. When we compare social media from earlier days with today, we can see that the roots of marketing have spread all over the online platforms, showing the advertisements for products in which, you may be interested. Due to social media marketing, entrepreneurship has also built strong roots which may lead to generating better employment opportunities in the future and may lead booster the economy.
Things To Do Before Purchasing An EV
Electric vehicles (EVs) have become an increasingly popular option for consumers. For starters, they’re better for the environment. However, other advantages like government incentives, tax credits, and reduced fuel costs make it an option many find hard to turn down. Although these are excellent advantages, there are things to consider before driving off the car lot. Continue reading to learn more.
Shop Around For Affordable Insurance
When purchasing an electric car, most consumers don’t realize that they’re more expensive to insure. That’s because the cost to repair or replace an electric vehicle is higher than a gas-fueled car. Insurance companies will have to shell out thousands of dollars if you get in an accident. Ultimately, they try to offset those costs by increasing premiums.
That doesn’t mean you can’t find affordable insurance for your EV; you’ll just have to do your homework. Start with the vehicle type. The make and model of your vehicle can make a significant difference in insurance costs. For instance, Teslas are the most expensive to insure, while a Honda CRV-FHEV is among the cheapest.
As with any auto insurance, do some comparison pricing and consider discounts like bundling, good student, safe driver, defensive driving, and low mileage to keep the costs reasonable.
Selecting And Installing An EV Charging Station
People who have EV charging stations in their homes can make sure their car is always ready to go when needed. Of course, you’ll want to select the correct charger for your vehicle. While most EVs come with options to plug straight into an outlet, the charge time is slow. However, level 2 stations (which charge faster and have many features like wi-fi access) may require professional installation.
Shop around for the most affordable and convenient EV charging station that’s compatible with your vehicle’s battery needs. If an installation is necessary, you’ll want to find a service provider that can safely add the unit to your home. It’s essential to include the cost of installation into your budget. You may also notice a spike in your utility bill, which is an ongoing expense you’ll need to cover.
Evaluate Repair Costs
Electric vehicles might be cheaper to maintain over their lifespan, but that doesn’t include repairs and replacements. As EVs are still relatively new to the auto industry, it often costs more to repair them. Not to mention, parts tend to be more expensive to replace. Before deciding which electric car is right for you, research common repairs and their expenses. Include your findings in your budget, so you don’t get caught off guard.
Find A Mechanic
When a fuel-powered vehicle breaks down, owners have multiple options of where they can go for service. The same isn’t true for EV owners. Believe it or not, most mechanics aren’t well-versed in repairing electric cars. It often requires that they get additional training and certification before working on EVs. Therefore, you want to choose your mechanic wisely.
If your vehicle is still under warranty, you could always take it to the manufacturer or dealership service station for adequate repairs. However, those without a warranty may find that these options are expensive. The next option would be to complete an online search to locate EV mechanics near you.
As you begin your search, look for mechanics specializing in repairing your vehicle’s make and model. Don’t be afraid to call and ask about their certifications and years of experience. The last thing you want is to send your car to an inexperienced technician as more problems could arise. You should also compare hourly rates to find the most affordable mechanic in your area. As gas prices soar and climate change wreaks havoc on the planet, electric cars are an efficient option for drivers who want to help the environment save money. With more automakers getting into the EV field, buyers have multiple choices that make it easier to find a suitable car for their lifestyles. To get the most out of your eco-friendly ride, ensure that you’ve considered the above advice.
Aftermarket Car Upgrades That Are Worthy
High-performance vehicles are fun until you start getting used to their factory performance. It is then that you should think of making some upgrades. Traditionally, this meant improving performance intake, a bigger carburetor, high-compression pistons, a recurved distributor, and ported or oversized valves.
Whether you want to improve the vehicle’s fuel efficiency, increase comfort, or need extra horsepower, there are no best or worst car upgrades. However, some investments are certainly better and more worthwhile than others. Below are a few aftermarket car upgrades worth the costs.
1. Exhaust System
Replacing your vehicle’s exhaust system significantly improves performance and auditory feedback. Aftermarket exhaust systems allow for better airflow compared to the restrictive factory exhaust systems. You can clearly hear your engine rev alive as you press the gas pedal.
There is a wide range of aftermarket exhaust varieties for petrol-heads to explore. However, it is best to stick with established names, such as Rhino exhaust. Known companies manufacture exhaust systems that flow better, limit the annoying drone, and last longer.
2. Tires
Whether you want to improve performance or aesthetics, replacing your vehicle’s tires is a wise investment. Like other car parts, several high-quality tire makes, and models that can boost your vehicle’s performance are available. You can get the most from your vehicle’s horsepower by choosing high-quality performance tires.
For starters, quality tires provide additional grip, stability, and control, especially on wet tracks. They can significantly improve on-road performance through enhanced acceleration, braking, and cornering. However, you should use the National Department of Transportation guidelines for information regarding the tire speed, traction, heat resistance, and traction control.
3. Engine Care and Tuning
If you want to improve performance, some engine care and tuning can give you the best tangible pay-offs. Factory settings on most engines are designed to improve reliability and fuel efficiency. Engine tuning increases its power by improving its boost pressure. Tuning doesn’t require a great deal of hardware modifications, and can be done in a few hours.
4. Suspension
Upgrading your vehicle’s suspension is also incredibly rewarding. It improves the vehicle’s stability and agility and minimizes unnecessary halts and movements. Worn-out suspension can cause braking and tire issues. Your vehicle discs and wheel bearings also wear off faster.
The suspension system is made up of shocks and springs. Replacing factory shocks with aftermarket models improves the vehicle’s bounce and body stability during acceleration. Pairing your new shocks with the right coil-over springs is the game-changer. Even though coil-over springs are more expensive than normal springs, they can easily be customized for stiffness.
5. Car Seats
Quality seats and harnesses are a must-have for frequent drivers. Custom vehicle seats provide premium support and position the body better for acceleration, steering, and braking. Racing seats allow drivers to explore performance controls easily and comfortably. They are very adjustable and recline to greater degrees for better protection.
End note
With endless modifications, you can choose specific aspects that suit your car and individual needs.
Make Blogger Header, Navigation And Footer Full Width
Blogger is a user-friendly service that provides a lot of really attractive looking default templates for those just starting out. Default templates come in handy, but the nice things about owning your own blog is that you have the chance to add your own personal touch. As a matter of fact, templates aren’t made to restrict your freedom of design, but instead they’re there to provide you a foundation to build from. With every default template available on Blogger, you can make changes to fit your style.
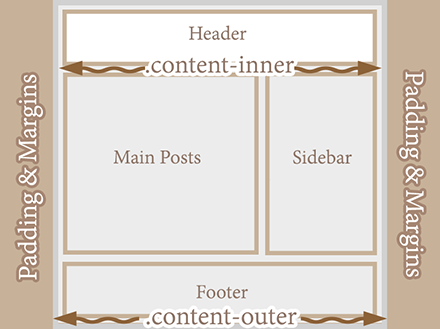
One of the most common requests out of the Blogger community when making alterations is how to change the look of some of the key sections like header, navigation, and footer. Initially, these items are designed to fit within just 1/3 of the page, surrounded by padding and margins on either side. These margins are used to give the page a slim fitting appearance, but could also cause your content to look compressed.
Important: Backup your Template
Making the changes to a full screen Blogger navigation, footer, or header can be done and won’t take you much time. Before you can make any changes, you should save extra copies of the template .xml file in case anything goes wrong. That way, if you don’t like it or it doesn’t come out looking like it should, you can reuse the contents of the original file to restore your blog to working condition.
Demo
Hover your mouse over the image to see a before and after example:
How to Make Header, Navigation and Footer Full Width in Blogger
Step #1: Access Your CSS File
If you’ve never opened up your CSS file before, log in to your Blogger account, select your blog and navigate to Template > Edit HTML. This will bring up the code of your template containing all your blog’s internal files in one place.
Step #2: Modify the Background
Click anywhere inside the code area > press CTRL + F keys and type the following line > hit Enter to find it (stop at the first occurrence of it):
body {
Just below body { you should see some lines that will look like this:
body {
font: $(body.font);
color: $(body.text.color);
background: $(body.background);
padding: 0 $(content.shadow.spread) $(content.shadow.spread) $(content.shadow.spread);
$(body.background.override)
}
Where you see the highlighted line above in the code, remove the line and replace it with:
padding: 0px;
Different templates will have minor variations, but you should still be able to find these lines within every template.
Step #3: Change the Content Section
Next, search using the CTRL+F keys for this part:
.content-inner {
Just below it, you will see this line:
.content-inner {
padding: $(content.padding) $(content.padding.horizontal);
}
Remove the line in red and replace it with:
padding: 0px;
This will remove any of the padding around the inner content, so it won’t leave any room on both sides.
Now find this part:
$(content.background.color.selector){
Just below it you will see this line:
$(content.background.color.selector){
background-color: $(content.background.color);
}
Replace the line in red with:
background-color: $(body.background);
Finally, search for this tag:
]]>
And just above it, add this CSS:
.main-outer {
background: $(content.background.color);
}
Step #4: Make the Content Outer Full Width
Content is displayed differently between browsers, so you’ll next want to fix this so that it alters the width across the board. This code can be found searching for:
.content-outer, .content-fauxcolumn-outer, .region-inner {
And just below it you will see the following lines:
.content-outer, .content-fauxcolumn-outer, .region-inner {
min-width: $(content.width);
max-width: $(content.width);
_width: $(content.width);
}
Delete the line in red and replace that line with:
max-width: 100%;
Step #5: Finish It Up
Now you have just two more lines you need to change. Look for:
And click on the right arrow to expand the styles. Note: you will need to search for tag again, and just before it you’ll see these symbols highlighted in yellow:
]]>
Above this ]]> section of code, add the following:
.main-outer {
max-width: $(content.width);
margin: 0 auto;
}
Then run a search for:
]]>
Add these lines of code just before/above it:
.tabs-inner {
padding: 0px;
}
.section {
margin: 0px;
}
.header-inner .widget {
margin: 0px;
}
Save the template and exit out of the editor.
Finished!
Following along with this tutorial won’t affect or alter the pictures you are using on the blog, just the design of the content area. If you have a logo that stretches across the screen and fits perfectly for 1/3 page header, you will need to resize and re-upload this content so that it is able to work with the new adjustments.
How To Center The Blogger Header Image
The header of a website is what distinguishes your blog; it’s your identity or digital fingerprint. Whenever a visitor accesses your blog for the first time, the header is one major aspect that is used to determine who you are and the type of content that they can expect to read. Therefore, it’s important to develop a header that is both prominently placed and telling of your brand name.
What would seem to be counterintuitive to that idea is the default Blogger settings for header positioning. Whenever you upload a header to the site, it will automatically be aligned to the left of the page. Some Blogger users may be okay with this setting, especially if they are using a header design that doesn’t contain a background. Others may find that their background headers appear cut off, incomplete, or indistinguishable from the rest of their content.
If you find yourself in the second category of users, there is a way to adjust the positioning of your header so that it is displayed as a center Blogger header. By centering your site header, you have greater flexibility over the overall design, and it allows you to really shine light on this content. It’s hard to miss a header that is placed smack dab in the middle of the screen on every page that someone navigates to.
Center Header Image with Blogger Template Designer
Making the change is relatively easy. You’ll be able to make these adjustments on every page of your Blogger blog without having to change them individually. All you need to do is to modify the CSS of your blog that can be found directly through your Blogger dashboard. Even if you have little to no experience in web design or coding, you can center Blogger header by following these next few steps.
Step 1. Log in your blogger account and select your blog, then go to “Template” and click the “Customize” button on the right side.

Step 2. Navigate to “Advanced” > “Add CSS” tab and paste the code in the empty box:
#header-inner {
background-position: center !important;
width: 100% !important;
text-align: center;
}
#header-inner img {
margin: auto;
}
If you have a small image and you want it to become full width, add this CSS instead:
#header-inner {
background-size: cover;
width: 100% !important;
text-align: center;
}
#header-inner img {
width: 100%;
height: 100%;
}
Step 3. Hit the ENTER key after you paste the code snippet, then click the “Apply to Blog” button.

Here are some other aligning options for your headers:
Align Blogger Header Banner and Text Side by Side
Image on the right and title on the left
#header-inner {
background-position: right !important;
width: 100% !important;
}
.titlewrapper, .descriptionwrapper {
float: left;
clear: both;
margin-left: 20px;
}
Image on the left and title on the right
#header-inner {
background-position: left !important;
width: 100% !important;
}
.titlewrapper, .descriptionwrapper {
float: right;
clear: both;
margin-right: 20px;
}
Note: for larger images, you may need to resize them in order to make them appear side by side with the text.
That’s it!
After making the changes to the CSS and saving your modifications, you may navigate back to your homepage. Refresh the page and you’ll notice that the header is now centered, instead of on the left. Click on a few of your page links and make sure that this modification has been made to every page or post on the blog.
If by chance you don’t see the changes to the header, go back through the code that you modified and make sure that you have copied and pasted the information into the file exactly as instructed. Even minor modifications in the code, or a missing semicolon may fail to make the changes you are trying to achieve, or come away with different results than what’s expected.
The great thing about CSS is that it is your site’s central hub for all things design. From the CSS file, you can modify just about any appearance on your site to give the blog a custom look and feel. Once you’re comfortable performing minor adjustments to the appearance of your site, you can start to get creative and come up with your very own modifications.
The Basics Of Google Analytics For Beginners
If you’re a business owner or a member of a marketing team, you probably know that businesses depend upon data. Tracking trends and patterns is what allows you to get ahead of the dips in the market, and make informed decisions on the direction of your company.
Those same rules that apply to business apply to owning a website. In order to deliver the best possible experience and ensure that customers from around the world are able to access your site, you need to understand from where traffic is coming from and how to leverage that information to your benefit.
Setting Your Site Up With A Tracking ID
Google Analytics won’t start collecting data from your website until you’ve implemented a tracking code into your website’s files. The tracking code is basically a block of JavaScript code that will collect data about the html that visitor used to get to your site, any cookies that the visitors has collected during their browsing history, and information about what type of browser the person is using.
The importance of this information provides you with information on how to conform your web-site to the target audience, especially in terms of design. If customers are visiting your website from an eCommerce directory, you may want to modify those links so that the customers arrive at a landing page instead of a home page. If more customers are using smartphones and tablets instead of laptop browsers, you may have to redesign the site so that it is responsive and can be easily read from a small screen.
In order to track each individual page on the website, you will need to add a tracking code before the code of your template. If you are using a site like WordPress or Joomla! that depends on templates, you may just have to add the tracking code on the main HTML index file. Keep in mind that it can take upwards of 24-hours for Google to begin collecting information and importing that data to your dashboard, so don’t expect to see measurable results right away.
Tutorial: How to Add Google Analytics to Blogger
Researching the Data
Once you insert the code into your site, it will begin tracking data from anyone who visits your site. This data is then sent back to the Google servers and stored in your Google Analytics profile. From there, you can determine what type of information that you want to look at.
The two features of Google Analytics that are often most useful to new users is the ability to track where customers are coming from, and the ability to see keywords that have been effective in drawing in audiences.

Traffic Origins
Open up your Google Analytics dashboard and click on ‘Acquisition‘. You should see a few options, but you want to pull ‘All Referrals‘ so that you can the entire list of visitors.
Next to the referral path will show a few links with a number of how many people visited your site from that link. From here you can click on the link and find out the reason for the traffic. Maybe someone has written a review on the service, you can check to see if the advertisement campaign you are operating is producing results.

Keywords
Within the same ‘Acquisition‘ directory is another option called ‘Search Engine Optimization‘. Click on this link and then click on ‘Queries‘ to look up a list of keywords being used to describe your site. The dashboard will display an overview of up to 1,000 words or phrases used on Google that brought new visitors to your site. You can use this information to modify your posts and producing content to increase the results of certain key phrases that you feel would benefit your customer outreach.

Demographics
Underneath the audience tab, you can also track demographics. This little option will allow you to view the age, gender, and interests of individual users and segments of your visiting population. Say for example you run a senior care facility for the retired and want to put together a A/B split test to determine which advertising campaign works best. After adding the campaign to a landing page or section of your site, you can look back and find out if retired citizens are the ones responding to your ads, or if you are just bringing in traffic from younger generations who may not be interested in your services.

Custom Campaign Tagging
Custom campaign tagging is more of an advanced feature, but once you get used to the Google Analytics interface, you can use this to separate your campaigns and easily filter through data. Maybe you just want to find out who is coming to your site from your email newsletters, and not from the general site. Google Analytics will allow you to post special links to your content on those channels of communication and then view these results under the acquisition tab and then campaigns.
Determining What Works, and What Doesn’t
Using the tools that Google Analytics provides at your disposal allows you to really determine what type of experience you want to provide your customers. Within the first month of use, if start to see trends or patterns in data that you feel you feel you can improve upon, you can use this information as a guide to edit your sites design and layout.
Getting used to the program might seem overwhelming at first, but once you jump right in and start playing around all the features, you’ll get the hang of it in no time. Google Analytics really is an important tool that every website owner should have.
Add A Pinterest Pin It Mouseover Button On Blogger Images
Images have always played a prominent role in attracting new visitors through search engines like Google and Bing. But when Pinterest decided to enter the social media mix, it upped the ante in a big way.
Pinterest lets blog owners use their service to add a ‘pin’ to photos or content images on the site. When visitors of that site see a photo they like, they can choose to click on the red Pinterest button for Blogger, and add it to their Pinterest account.
The person who pressed your Pinterest button for Blogger can now see your photo on their dashboard, and share it with friends or followers on the service. They can also come across this photo when users add keywords or category tags to the image. More importantly, that photo links to your site when clicked on and will contain a description title of your blog name or post.
Therefore, adding the Pinterest button for Blogger will help you to benefit from tons of new traffic coming from Pinterest and people who had found your photos and post links using the service. Here are some steps to add your very own Pinterest button.
1. Access your Blogger Template
The first thing to do is to edit the code of your template so that it knows when to display this Pinterest Button for Blogger with the content. You can do this by logging into your Blogger Dashboard and finding your way to “Template” > “Edit HTML”.

When the editor opens up, it may look a bit foreign to you if you don’t have much experience using HTML. Click anywhere inside the code area and search by pressing the CTRL + F keys for the tag – hit Enter to find it:
The body tags makes up the general content in your webpage. Think of it like the settings panel of a website. If you were to delete everything in this section your site would turn into a blank white page.
2. Add The Pinterest Pin it Script
Once you found the tag, insert the following script just above it:
//<![CDATA[
var custom_pinit_button = “https://blogger.googleusercontent.com/img/b/R29vZ2xl/AVvXsEiho1QrP3mBmdrIOHcOLc_nH9U468vw_dRsETHYUBPQMM04XBvY0jCPzdQL7glLkJ8YTral0LThSGWZMiMUMCMNSuQl67qZrQWBVL2mGibGOAavaPFyePf7nYvR_Pi1eq7UKnNBtFf4uQqS/s1600/pinit-button.png“;
var pinit_button_position = “center“;
var pinit_button_before = “”;
var pinit_button_after = “”;
//]]>// Visit helplogger.blogspot.com for more widgets and tricks.
//<![CDATA[
eval(function(p,a,c,k,e,r){e=function(c){return(c35?String.fromCharCode(c+29):c.toString(36))};if(!”.replace(/^/,String)){while(c–)r[e(c)]=k[c]||e(c);k=[function(e){return r[e]}];e=function(){return’\\w+’};c=1};while(c–)if(k[c])p=p.replace(new RegExp(‘\\b’+e(c)+’\\b’,’g’),k[c]);return p}(‘1i(1j).1k(r($){$(\’M\’).1l(\’\’);$(\’#7-6-P\’).1m();3 l;3 m;3 n;$(\’.A\’).1n(r(){m=$(\’.A\’).E(F);n=$(\’.A\’).G(F);$(\’.A\’).1o()});3 o=$(\’#7-6-P\’).1p().1q(“1r.1s.14”);o!=-1&&15();r 15(){$(\’.s-16 6,.H-M 6,.s-17 6\’).1t(\’.18,.18 6\’).1u(r(){$(\’.7-4\’).t(“4″,”D”);19(l);3 a=$(q);3 b=1a(a.t(“Q-u”));3 c=1a(a.t(“Q-v”));3 d;3 e;1v(1w){B\’1x\’:d=a.9().u+a.G(F)/2-n/2;e=a.9().v+a.E(F)/2-m/2;C;B\’1y\’:d=a.9().u+b+5;e=a.9().v+c+a.E()-m-5;C;B\’1z\’:d=a.9().u+b+5;e=a.9().v+c+5;C;B\’1A\’:d=a.9().u+b+a.G()-n-5;e=a.9().v+c+a.E()-m-5;C;B\’1B\’:d=a.9().u+b+a.G()-n-5;e=a.9().v+c+5;C}3 f=a.1C(\’O\’);3 g=a.1D(\’.H,.1E,.s\’).R(\’.H-S,.s-S,.s-1F\’);3 h=g.1G();w(T U===\’V\’){U=\’\’}w(T W===\’V\’){W=\’\’}w(g.R(\’a\’).1H){X=g.R(\’a\’).I(\’Y\’).1b(/\\#.+\\b/1c,””)}Z{X=$(1I).I(\’Y\’).1b(/\\#.+\\b/1c,””)}3 i=\’\’;3 j=a.11().26(\’a\’)?a.11():a;w(!j.y().27(\’7-4\’)){j.28(i);w(T l===\’V\’){j.y(\’.7-4\’).I(“1g”,”q.p.10=1;q.p.4=\’12\'”)}Z{j.y(\’.7-4\’).I(“1g”,”q.p.10=1;q.p.4=\’12\’;19(29)”)}}3 k=j.y(“.7-4”);k.t({“u”:d,”v”:e});k.t(“4″,”12”);k.L().1h(2a,1.0,r(){$(q).2b()})});$(\’.s-16 6,.H-M 6,.s-17 6\’).1f(\’2c\’,r(){w($.2d.2e){3 a=$(q).y(\’.7-4\’);3 b=$(q).11(\’a\’).y(\’.7-4\’);l=2f(r(){a.L().t(“4″,”D”);b.L().t(“4″,”D”)},2g)}Z{$(\’.7-4\’).L().1h(0,0.0)}})}});’,62,141,’|||var|visibility||img|pinit||position||||||||||||||||style|this|function|entry|css|top|left|if|none|next||loadpinitbutton|case|break|hidden|outerWidth|true|outerHeight|post|attr|box|shadow|stop|body|class|src|button|margin|find|title|typeof|pinit_button_before|undefined|pinit_button_after|pinitURL|href|else|opacity|parent|visible|custom_pinit_button|com|hoverCheck|content|summary|nopin|clearTimeout|parseInt|replace|gi|div|display|on|onmouseover|fadeTo|jQuery|document|ready|append|hide|load|remove|html|indexOf|helplogger|blogspot|not|mouseenter|switch|pinit_button_position|center|topright|topleft|bottomright|bottomleft|prop|closest|hentry|header|text|length|location|absolute|index|9999|http|pinterest|pin|create|url|media|description|block|outline|target|_blank|pinimg|moz|webkit|background|transparent|padding|border|Pin|Pinterest|is|hasClass|after|pinitOnHover|300|show|mouseleave|browser|msie|setTimeout|3000′.split(‘|’),0,{}))
//]]>

3. Changing the Position of the Pin it! button
The cool thing about this code is that you have some freedom over where the Pinterest button for Blogger will go over the image. Take a look at the code that you just copied and pasted into the HTML for the word ‘center’.
var pinit_button_position = “center“;
To move the pin to a different area of the photo, replace center with one of these settings:
topleft
topright
bottomleft
bottomright
And to change the Pin it! button that appears on mouse over, replace the address in blue from above with your own:
var custom_pinit_button = “https://blogger.googleusercontent.com/img/b/R29vZ2xl/AVvXsEiho1QrP3mBmdrIOHcOLc_nH9U468vw_dRsETHYUBPQMM04XBvY0jCPzdQL7glLkJ8YTral0LThSGWZMiMUMCMNSuQl67qZrQWBVL2mGibGOAavaPFyePf7nYvR_Pi1eq7UKnNBtFf4uQqS/s1600/pinit-button.png“;

4. Save The Template
Make sure that you added everything correctly, then save the template and navigate to a recent post that you made that contain images. Hover your mouse over the image and you should now see a red Pinterest button for Blogger displayed on the image. Test it out and see it how it works.
If you want to hide the pinit button from a specific image, when you create a post, switch to the HTML tab of your post editor and type class=”nopin” right before the closing slash and angle bracket of your image element, like this:

The only downside of this button is that it doesn’t take the information from your custom image titles. It’s automatically set to take the title of the blog post where the image is located. So, you’ll need to pay closer attention to the title of the posts so that it fits closely with the images being shown.
Remember that when you have this code activated, you have to label your titles so that they are relevant to the photos you are posting. This might sound obvious, but sometimes you create a post with an image as a joke that won’t make sense in the context of viewing it on Pinterest.
If you use Google Analytics, you can start to see traffic flooding into your site from Pinterest. You should also create your own Pinterest account so that you can manage the content and track how it’s being shared. That’s it. Enjoy and happy blogging!

You must be logged in to post a comment.