

A best custom knife is the one that fits your tasks, your hand, and your budget without useless extras. Everything below is about how to reach that state consciously.
What will you actually do with the knife?
A clear purpose narrows your choices for knife type, steel, and geometry by 3–5 times and saves money on unnecessary options. Don’t start with steel — start with the use case.
For the USA, the most common tasks are:
- EDC in the city: opening packages, cutting straps, small food tasks.
- Hiking / bushcraft: woodwork, camp chores, field dressing game.
- Hunting and fishing: gutting, skinning, precise work, corrosion resistance.
- Kitchen: cutting food for hours on a cutting board.
- Collecting and aesthetics: rare materials, limited runs, maker’s artistic style.
If more than 70% of the time your knife will live in the city — that’s an EDC folder. If more than 50% of the time it’s forest and hunting, look at fixed blades.
How do blade shapes and geometry change real performance?
Blade shape and geometry influence how a knife feels in use more than the specific steel brand within the same class. It’s like tires on a car: the engine matters, but you feel the tire profile every second.
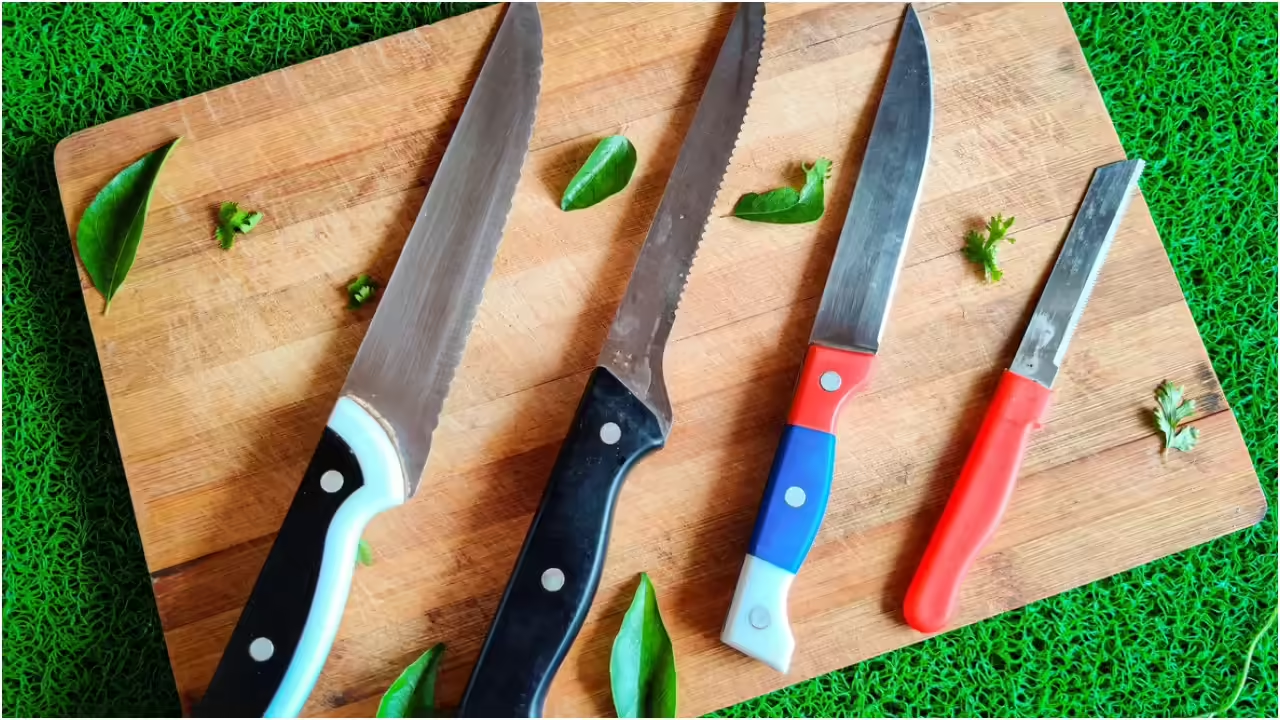
Basic shapes:
- Drop point: a universal for EDC and hunting, safer tip, easy tip control.
- Clip point: more aggressive tip, pierces better, but weaker to lateral stress.
- Sheepsfoot/wharncliffe: extremely controlled cuts, great on cardboard and rope.
- Trailing / skinning: maximum control for skinning tasks.
Grind geometry:
- Full flat: easy cutting, thin behind the edge, but less durable for hard batoning.
- Hollow: “bites” into material, great for meat and EDC, but the thin section near the edge is sensitive to impacts.
- Saber/convex: handles impact and lateral loads well, but requires more effort when cutting food and cardboard.
The compromise is simple: the thinner it cuts (thin behind-the-edge, 0.1–0.2 mm), the more careful you must be with lateral loads; the thicker behind the edge (0.4–0.6 mm), the more durable it is, but the cut feels “duller.”
Which blade steels actually make sense for US custom knives?
Steel sets edge retention between touch-ups, corrosion resistance, and maintenance difficulty. US makers most often work with:
- For EDC and general-purpose: Magnacut, S35VN, 20CV/204P, Elmax. With proper heat treatment, they give about 10–15 days of active EDC cutting (cardboard and food) without serious sharpening.
- For heavy woods use: 3V, 4V, Z-Wear, 80CrV2. Edge retention on rough work is 30–50% higher than “simple” carbon steels, plus high toughness.
- For kitchen: AEB-L, 14C28N, Nitro-V, simple carbons like 52100. Thin cutting, easy to sharpen, usually need 1–2 light touch-ups per week with daily cooking.
- For “eye candy” (damascus, mosaic): the pattern itself doesn’t increase performance, but raises collectible value and price by 30–200%.
Choosing ultra-hard steel (63–65 HRC) for super edge retention means paying with more difficult sharpening and less tolerance for impacts on bone and nails. On the other hand, softer steels (58–59 HRC) need sharpening more often, but are very hard to chip or break at the edge.
Handle ergonomics: how should a custom knife feel in hand?
The handle of a custom knife should let you work for 20–40 minutes without “hot spots” or blisters; otherwise you simply won’t carry the knife. The check is simple: a few “dry” cutting motions in all common grips.
Materials:
- For work: G10, micarta, textured carbon fiber, stabilized wood.
- For wet environments and fishing: rubberized or micarta handle with pronounced texture.
- For collecting: rare stabilized burls, ivory, bone, exotic composites.
If your palm is 9–10 cm wide, a handle thickness of 18–20 mm is usually comfortable; thinner than 15 mm looks great in the pocket but tires the hand in prolonged use.
Lock types and carry options for EDC customs
The lock determines safety and ease of one-handed closing. In the US market the most common are:
1. Liner/Frame lock: familiar, intuitive, easy to service; downside — more sensitive to dirt and prying forces.
2. Crossbar-style (Axis-style analogs): easy to close, holds securely; trade-off — more complex mechanism and potential play if poorly fitted.
3. Backlock: extremely reliable, handles downward load well, but takes practice for smooth one-handed closing.
Carry options:
- Deep-carry clip — the knife is almost invisible, but a bit harder to grab with gloves.
- Standard clip — faster access, but sticks out of the pocket.
- Plate or removable dangle sheath (for fixed blades) — more convenient in the woods than in the city.
What separates an honest custom from just an expensive knife
A custom is worth its price if:
- Blade centering in a folder consistently stays within about 0.2–0.3 mm, with no blade play.
- Thickness behind the edge along the entire blade varies by no more than 0.05–0.1 mm (measured with calipers).
- Hardness matches the stated value (the maker is not afraid to show Rockwell tester data).
- Handle and bolster fit: no steps, seams, or sharp edges — your fingers don’t feel transitions.
Studies of real cutting performance show that the difference between proper heat treatment and “burnt” steel of the same type can give 40–60% difference in total rope cut length before dulling. In practice, that’s the difference between touching up once a week and once every three weeks with the same use.
How to work with US custom makers and not overpay?
Good collaboration with a maker doesn’t start with “how much?”, but with a clear spec of 5–7 points. A rough order of operations:
- Define tasks (EDC/woods/hunting/kitchen/collection) and usage frequency in hours per week.
- Specify preferred blade length: for EDC 7–9 cm, woods 10–13 cm, heavy field use 13–16 cm.
- Discuss steels within the limits of your sharpening experience (are you ready to sharpen hard powder steels).
- State an honest budget and realistic expectations on lead times.
Then ask the maker for:
- Photos and examples of previous work in a similar format.
- Heat treatment details (HRC range and who does heat treat if it’s an outside lab).
- Basic agreement/confirmation of terms on deposit, timelines, and warranty.
Typical deposits in the USA are 30–50% with queues of 1–6 months; anything cheaper and faster often means compromises in depth of customization or attention to detail.
Three mistakes that ruin a “dream knife”
1. Buying an overly “tactical” knife for city life
A 4.5–5 mm thick spine, aggressive shapes, and huge clips look impressive but get in the way for 80–90% of EDC tasks.
2. Focusing only on steel and the maker’s brand
Paying 30–70% extra for a name won’t fix an uncomfortable handle, odd geometry, or unnecessary extra 80–100 g of weight.
3. Ignoring weight and size
For EDC, a knife heavier than 150 g and longer than 22 cm open often “moves” into a drawer after a couple of weeks — people just stop carrying it.
How to choose your ideal custom in the USA: short checklist
You can literally keep this checklist open while messaging the maker:
1. Describe scenarios (where, how often, and on what materials).
2. Choose blade size range and overall format (fixed/folder).
3. Decide your main priority: cutting performance, toughness, corrosion resistance, or aesthetics.
4. Agree on steel and hardness based on how you maintain your knives.
5. Discuss blade shape and grind specifically for your tasks.
6. Check ergonomics and weight against similar knives you’ve already handled.
7. Fix budget, lead times, warranty, and service conditions.
A good custom knife is like footwear tailored to you: it’s not the loudest piece in the display, but it’s the one you actually use for years. Aim for an honest dialogue with the maker, ask specific questions, and demand engineering-level answers — and your next knife is very likely to become that “best custom” specifically for you.


You must be logged in to post a comment.